Criar uma ACP do contrato principal com base em um registro de imprevisto
Objetivo
Para criar uma possível ordem de alteração para um contrato principal a partir de um evento de alteração.
Histórico
Se sua empresa tiver configurado seu projeto para usar uma estrutura de alteração contratual de dois (2) níveis, o processo de registro de imprevisto exigirá que você crie um alteração contratual potencial. Em seguida, você criará a ACCP (Alteração contratual de contrato principal) na ferramenta Contratos principais. Ao criar uma ACP (ACP), os SOV (Itens do contrato) serão preenchidos com os valores de preço mais recente.
Coisas a considerar
- Permissões de usuário necessárias:
- Permissões de nível "Padrão" ou superior na ferramenta Registros de imprevistos do projeto.
E - Permissões de nível "Padrão" na ferramenta Contratos principais do projeto e a definição de configuração "Permitir que usuários de nível padrão criem ACPs" precisam estar habilitadas na ferramenta Contratos principais. Consulte Definir configurações: contratos principais.
- Permissões de nível "Padrão" ou superior na ferramenta Registros de imprevistos do projeto.
- Informações adicionais:
- Dependendo da configuração do nível de pedido de alteração definida para a ferramenta Prime Contracts, possíveis pedidos de alteração podem ser transferidos para um (1) dos seguintes itens:
- Para dois (2) níveis de alteração contratual, um <a class="F1" title=" " href.path="//references/construction-management/glossary-of-terms" href.anchor="Prime_Contract_Change_Order" href.nome de arquivo..."> contrato principal alteração contratual.
- Para pedidos de alteração de três (3) níveis, uma solicitação de pedido de alteração.
- Para saber mais, consulte, <adata-ol-has-click-handler="" target="_blank" title=" " href.path="//faq/what-are-the-different-change-order-tier-settings-in-project-financials" href.nome de arquivo!"> Quais são as diferentes definições do nível de alteração contratual nas Finanças do projeto?
- Dependendo da configuração do nível de pedido de alteração definida para a ferramenta Prime Contracts, possíveis pedidos de alteração podem ser transferidos para um (1) dos seguintes itens:
Pré-requisitos
- A ferramenta Registros de imprevistos precisa estar ATIVADA no projeto. Consulte Adicionar e remover ferramentas de projeto.
- As duas (2) configurações do pedido de alteração de nível devem ser ATIVADAS na ferramenta Prime Contracts. Consulte Configurar o número de níveis de pedido de alteração de contrato principal.
- A contrato principal do projeto precisa estar na status "Aprovado". Consulte Aprovar um contrato principal.
Passos
- Acesse a ferramenta Registros de imprevistos do projeto.
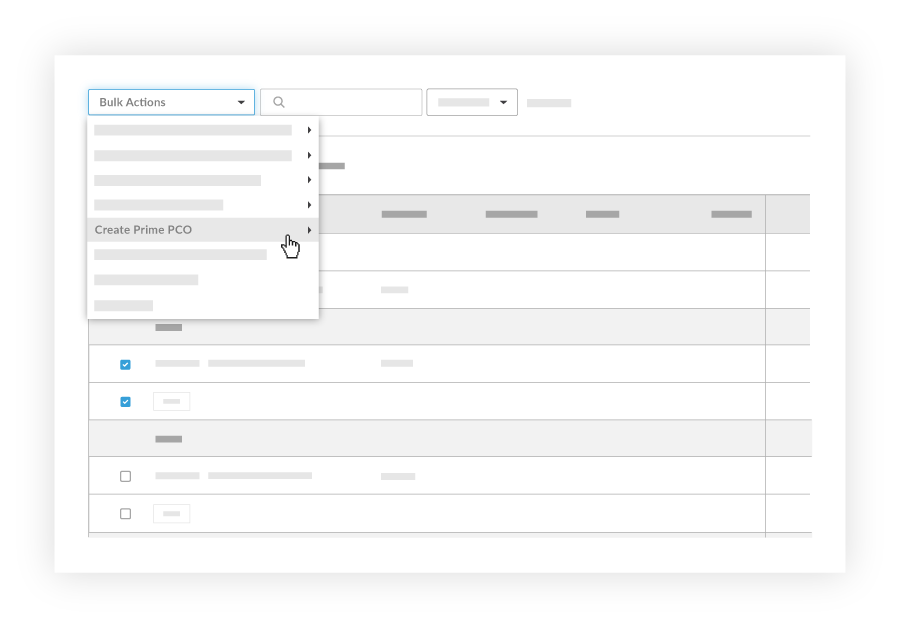
- Na tabela, marque as caixas de seleção para um (1) ou mais item de linha (s) de registro de imprevisto a serem incluídos na nova alteração contratual potencial.
Observação
O Procore cria os SOV (Itens do contrato) do alteração contratual potencial usando o registro de imprevisto selecionado item de linha (s). - Clique no menu Ações em massa e escolha a opção Criar ACP Prime . Em seguida, escolha a opção de contrato apropriada no submenu.
- Na página 'Novo pedido de alteração potencial', preencha a seguinte entrada de dados:
-
Observação
Se o recurso SdC (Solicitação de cotação) estiver ATIVADO, você poderá configurar a ferramenta Registros de imprevistos para incluir qualquer anexo adicionado à resposta de SdC (Solicitação de cotação) a um revisor. Para obter instruções, consulte Definir configurações: alterar eventos.
- Clique em Criar.
Obs.
- A lista suspensa Item de linha associado só aparece se a conta Procore da sua empresa estiver integrada a um sistema ERP integrado e a ferramenta Prime Contracts estiver ativa no projeto.
- Ao adicionar itens de linha aos SOV da alteração contratual, você precisará selecionar um Item de linha associado para cada nova item de linha. Você pode designar uma (1) item de linha associada ou usar a mesma item de linha associada para vários itens de linha. A escolha de criar uma nova item de linha para associar criará automaticamente uma nova item de linha de zero (0) dólar nos SOV originais do contrato.
If you would like to learn more about Procore's change events management software and how it can help your business, please visit our construction change order product page  .
.